Monday, July 14, 2008

Scalloped Chicken in Mushroom & Mustard Sauce

It is soo much fun (and yes touching) when friends and family call up to say that they actually open and read my blog and are looking forward to reading more about our escapades in our tiny kitchen:) I am really touched when Ma and Papa from Udaipur tell me that they regularly read my blog to know whats going on in our life, and when my Mom (the last person I thought would ever become net-savvy and read my blog) from NYC emails to tell me that the blog pics look very nice and that this is a very cool way to not lose good recipes as well as be in touch!! :)

Also, I am soo surprised to learn that people I never knew existed, people outside my circle of friends and family - actually dropped in to read (and comment) about my recipes:) Folks!! this makes me feel soo happy and special:) A big thanks to all who are reading this:)

Yes - I simply cant stop myself from grinning now..but its ok! am sitting all by myself..so no pains:) Now lets get back to business..serious business. Scalloped Chicken Dish recipe. Like I had mentioned in my earlier Fruit Salad post, I had served this simple chicken dish with some Penne in Tomato Sauce for V-dinner.
(Ahh...I am re-writing the post from here on - somehow I was not connected to the internet when I completed and published the post...so I lost all that I'd written in one sitting session:( ..so here it goes..again).
The Chicken: I got these really fresh succulent boneless chicken breasts, which I then cut in thin slices (you can in turn, pound them under a layer of plastic foil with a mallet to get nicely scalloped pieces).These I marinated for a couple of hours in extra-virgin olive oil (EVO), minced garlic, salt, pepper and Worchestershire sauce.
The Sauce: I sauteed some finely diced onions and garlic (can be omitted as well) in some EVO and then a cup of diced fresh mushrooms. To this, I added 2 tbsp of cornflour, and salt, pepper, dry mustard powder and Worchestershire sauce - add water to this, stirring continously till I got a creamy sauce bubbling away in my saucepan:) Ideally, I should have added some chicken/vegetable stock..but then I was too lazy to make that also, so just adjusted the seasonings in the sauce:)
The Assembling: While the sauce is bubbling over the fire, I pan-fried the chicken scallops in EVO over a skillet - this does not take too long and the scallops turn crispy and golden in a few minutes:) I simply placed the scallops on the dinner plate and poured the sauce over them. You can garnish with some finely chopped parsley..we were to hungry to even bother by then:)

Tangy Fruit Salad

I was browsing through the past pictures of our dinner, when I came across this Fruit Salad pic..and felt like sharing this colorful pic with you all:)

Actually this pic is from our V-day dinner that I'd cooked for my hubby dearest. Since we could not go out for our 1st V-day dinner together because of his multiple fractures, he was feeling pretty low and lousy, so had made his favorite pasta dinner for him:) - Penne in Tomato Sauce with Chicken Scallops in Mushroom Mustard Sauce, teamed with a tangy Fruit Salad and some Chocolate Custard.
I just used a few fruits available round the corner in February here, and since Pune is simply run-over with fresh strawberries then, it was the main fruit for the salad. So I simply diced some apples &oranges and added some whole strawberries and cherries, with some ruby red pomegrenate seeds to the salad bowl. For the salad dressing, I mixed some olive oil, fresh lemon juice, salt and pepper with fresh coarsely hand-broken celery leaves and sticks and poured over the fruits. Done! The Salad Bowl was ready in a jiffy:)

Our new baking dish

After the moratorium imposed on me by hubby dearest on baking any more cakes for a while, I was sulking that I was not getting much baking to do..so yesterday he took me to Shopper's Stop for shopping:) and guess what?? We ended up buying a nice 1.5 L borosil baking dish for preparing our pasta dishes:)
Yes..yes..I know it is a bit too big for 2 people, and also our microwave, as well as our OTG (we had to place the dish diagonally to close the oven door), but then both of really liked the rectangular smooth shape:)
So obviously, after buying the dish..both of us rushed back home (on the way picked up a packet of button mushrooms and american sweet corn) and prepared a simple pasta dish for dinner. Our original plan was to use penne rigate for the pasta, but somehow we had runout of it, and I was not too keen on spagetti, so we settled on elbow macaroni to get a dish very similar to the Baked Veggies recipe, only instead of the white bechamel sauce, we prepared this real yummy tomato sauce.
Tomato Sauce: We blanched 4 big red tomatoes in the microwave and then pureed it. In the saucepan, saute some minced garlic and add the puree. Season it with some Worchestershire Sauce, mixed dried herbs, some more oregano mix and salt and pepper. Since we underestimated the volume of our dish, we had used only 3 tomatoes, so then we had to add some thick cream (or milk - your choice) to the sauce - it not only added bulk to the sauce, but also make the pasta smooth and creamy:)
We smothered the pasta-vegetables-pasta layer combo with the sauce and grated some cheddar cheese on top. The cheese gave a very crunchy crust on top, which we completely loved:)

Pasta dinners are fairly common at our place, generally once a fortnight is the norm, but both of us really like baked pasta dishes..it does give something extra to it:) So apart from being nutritious, healthy, simple and non-fussy, it is also soo very delicious!

Tuesday, July 8, 2008

No-fuss Margarita Cake

Had baked this simple no-fuss cake a while ago, since I wanted to try out cakes other than chocolate cakes and also because I like simple flavoured cakes. I had made this small cake in my 5 inch cake tin, and my hubby liked it soo much, that he again pestered me into baking a big one after 3 days. Since we were leaving on a biking trip with a few friends early the next morning, I forgot to take pics of the big square cake - but since I'd packed it for the trip, everybody enjoyed it immensely:)

I followed the recipe from here - though I took all 1/3rd of the measurements listed. Also my cup reference was 180 ml, instead of the usual 250 ml since I used a small egg. For the glaze, I omitted the tequilla and did not cook the glaze much the 1st time. For the bigger cake, I cooked the sugar mixture till it turned quite thick and gooey, but somehow though it looked very nice on the cake, yet biting into it was slightly messy, since the glaze would stick to the teeth:( Next time, I will not overcook the glaze, but leave it slightly runny.
The cake came out very soft and delicately flavoured..my hubby simply loved the idea of grating lime rind/zest into the cake batter:) Also, I had no trouble taking out the cake from the caketin. Overall, this was a great recipe to try - simple, non-messy, quick and delicate lemony flavoured:)

Chocolate Truffle Cake

Baked this lovely chocolate cake last saturday evening on a whim - and it simply turned out great. I am fond of baking cakes which are non-fussy and which do not require me to use all the utensils and gadgets available in my small kitchen. This cake batter was prepared within 15 mins using only a small hand-held manual whisk and a big porcelain bowl:) The top icing was a little fussy - somehow it was a bit too runny for my taste.
Actually I did not have a 8" round baking cake-tin, only a big square tin and a small (hardly 5") round tin. Somehow my cakes in the square tin always were cracking on the top, so this weekend, we bought our new 8" round cake -tin:) I have described the recipe below, which I had longtime back written down from somewhere I dont remember now.

Ingredients for the Chocolate Cake
# 3/4 cup flour (maida) - my base cup is 250 ml here for reference
# 2/3 cup cocoa powder
# 4 eggs
# 1/2 cup vegetable oil
# 3/4 cup powdered sugar
# 1 1/2 tsp baking powder, 1/2 tsp baking soda
# 1/4 tsp vanilla essence
Method:
1. Sift the flour, cocoa, baking powder and baking soda together and keep aside.
2. Beat sugar and eggs in a big bowl till very frothy. Add the vanilla essence. Gradually add oil while beating the mixture lightly. Slowly fold in the flour mixture in this egg-oil mixture. Do not over-beat. The batter is done!!:)
3. Meanwhile, have a 8 inch round cake tin greased and dusted, and preheat the oven at 150 C. Pour the cake batter in the tin and bake for 30-40 mins till a toothpick inserted in the centre of the cake comes out clean. Let the cake cool a while, before removing from the tin. My cake turned out simply divine - soft, fluffy, with no cracks and an uniform dome with nearly 2 inch thickness.

Ingredients for Middle Icing
# 75 g softened white butter
# 1/2 cup sifted icing sugar
# 2 tbsp cocoa powder
# 1 tsp vanilla/brandy/rum essence

Method: Beat the white butter till soft and creamy, then add in the icing sugar - beating well till it turns fluffy. Add the cocoa powder to the get the desired colour - preferably lighter shade than the cake. Keep this icing in the fridge for a while. Meanwhile, cut the cool cake into two parts (We used a string, or you can also use a big flat knife). Soak both the parts of the cake with some sweet aromatic liquid (we used water+sugar+essence, or alternately you can also use coke or milk instead of water). Spread the icing on the lower half of the cake using a spatula and cover it with the top half.
Ingredients for Chocolate Icing for top
# 1 tbsp white butter
# 1 big dark chocolate slab - 80-90 g
# 1/2 cup icing sugar
# 2 tbsp water
# 1 egg
Method: Boil the water in a small saucepan and break the cocolate slab in small pieces and put it in the sauce pan for melting. Keep stirring it all the time, on low heat and when completely melted, add the butter and stir. Remove from heat and add the icing sugar - mixing all the time for it to dissolve completely. Break an egg into this and immediately stir vigorouly and cook on low heat. Stir continously, till you get a thick smooth pouring consistency. Do not let this mixture boil. Somehow, we had to cook this icing for a longtime, and then refrigerate it for 5-10 mins to get a nioce thick icing. Just pour this over the cake - it will flow on its own and cover the cake completely. Decorate the cake as you wish - we simply threw a handful of cadbury gems on it, to make it vibrant and colorful:) Refrigerate the cake for a couple of hours to set the icing completely.
As you can imagine - this is a huge cake between the two of us - so we've been hogging on it for the last 2-3 days:) Now that people have started complimenting my hubby on his new-found paunch, he has strictly prohibited me from baking any more cakes this month:(, so I guess, now I will have to fish out pics of earlier taken food and put them on my blog. Tho' the good part is that I get to finish off the rest of the cake today and lick the crumbs off the plate, since he is on a "strict diet" since this morning;)

Thursday, July 3, 2008

Banana Chocolate Cake

I am not too fond of bananas, but my hubby always assures me that he simply adores them. So whenever I feel like indulging him ;), I buy a few bananas for him. As it so happens, he has never ever (in our 7 months of marriage) finished off all the bananas - which means that I've to see atleast a couple rot before my own eyes. So when I was reading this blogpost by "happyhomebaker" as a great way to use up over-ripe bananas, I simply shouted out with joy:) You see - there were again a couple of these over-ripe bananas sitting on my 'fridge top, which I knew none of us would eat, and I simply HATE having to throw away good food stuff. So I promptly set about to bake this cake - and I must say, that I was simply thrilled with the outcome. Firstly, it was soo simple to prepare the batter (unlike a few cakes - this required only one big mixing bowl) and since I dont have a food processor or blender, the batter required only brisk whisking with hand. Also, the cake came out soft and moist (am not too fond of dry cakes). 
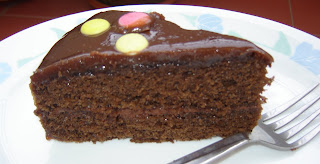
I had substituted 2 tbsp of dark cocoa powder for the flour, and used demerra sugar (dark brown sugar), because of which my cake turned out dark brown in colour, with a nice subtle chocolaty flavour, masked by the distinct banana flavour. Since I did not have spare bananas to decorate on the cake-top, I sprinkled some icing sugar after turning it out. I think the outcome is pretty good (though the cake had cracked a bit on top) - do not go with my pics - am not a very good food photographer:(
I think this cake will go down very well with kids or as a coffee cake. You can increase the cocoa powder quantity, if you want a more chocolaty flavor:) Happy Baking!!

Baked Vegetables and Macaroni

This is for my friend Shobhana who wanted a simple baked pasta recipe - or else I am too lazy to compose a blogpost and publish it:) This was created by reading a few classic "Macaroni and Cheese" recipes and "Baked Vegetables" recipes - I simply married the two.
I have divided this recipe into 3 parts for convenience sake (Shobs, very much like me, is not much of a cook - so this break-up is helpful)

A. The Macaroni - I bought durum-wheat elbow shaped macaroni and boiled around 1 cup of it in salt water till al dente (keep checking while stirring - we dont want it to get too soft, since it will also go through the baking cycle). Then rinse it out with cold water and strain it and keep it aside - you can drizzle a bit of oil to prevent it from sticking).

B. The Vegetables - I chopped around 2 cups of assorted vegetables (red, green and yellow bellpeppers, carrots, french beans, cauliflower or you can use broccoli, button mushrooms and red spanish onions). Separately, I boiled a little bit of sweet corn niblets and green peas in water till just cooked. For cooking the vegetables, in 1 tbsp of olive oil, saute the veggies along with 1 tsp of minced garlic. I added the bellpeppers at the end, since I like them crisp. Mix these veggies with the boiled macaroni and keep aside.

C. The White Sauce (or the bechamel sauce) - In about 1 tbsp of butter or margarine, saute some finely chopped onions (about 1/2 cup). Once the onions have caramelized, add 2 tbsp of all-purpose flour or maida and fry gently till it becomes brown. Take care not to over-brown it since it burns very fast. Then add 2 cups of milk and stir so remove any big lumps of flour. While the sauce simmers, add salt and pepper to your taste and a dash of dry mustard powder and Worchestershire sause. If cholesterol is not an issue for you, crumble some Cheddar cheese in the bubbly sauce. If the sauce becomes too thick, you can add some extra milk.

These 3 things are then simply dumped together to create our dish. Grease a large baking dish (I used a deep porcelain baking dish), and put the veggies-macaroni mixture in it. I've seen cooks who prefer to layer the veggies and macaroni - I was in too much of a hurry to do that:) Then simply pour the thick creamy-cheesy white sauce on top to swamp our colorful vegetables. Sprinkle some bread crumbs on top, along with some grated cheese and decorate with halved cherry tomatoes and olives. Bake the dish uncovered at 200 C for 30 mins. If the crust becomes too brown - you can loosely cover the dish with some aluminium foil.

This healthy and colorful dish is enough for a family of four - myself and hubby had it for lunch as well the next day and we enjoyed every bit of ut:) If you are health conscious, you can simply avoid adding any cheese or alter the amount accordingly.


I would like to read your comment and suggestions on this post. I am not much of a photographer as you can see from these pics, but I am still learning. Also since since this just my 2nd blogpost, I am also learning "blogging":)